It may not always be practical or affordable to rebuild the cabinets
in a kitchen or bathroom. Refacing them might be the best solution. But
what does refacing involve? As with most construction projects, the
answer depends on lots of details.
Project: Refacing kitchen cabinets.
First step: Determine
if your cabinets can take the restoration process well enough to be
revitalized for at least another 10 years of life. If the cabinet body,
or carcass, is in bad structural shape, is water damaged or will not
take to refinishing well enough, you might have to replace the cabinets
in a full kitchen remodel.
Why reface: In the most basic
process, you will be leaving the cabinet intact and in its same place.
This avoids the expense and effort of taking out and replacing the
entire cabinet. So the advantages are less expense, less material going
to the landfill and a less-complicated construction process.
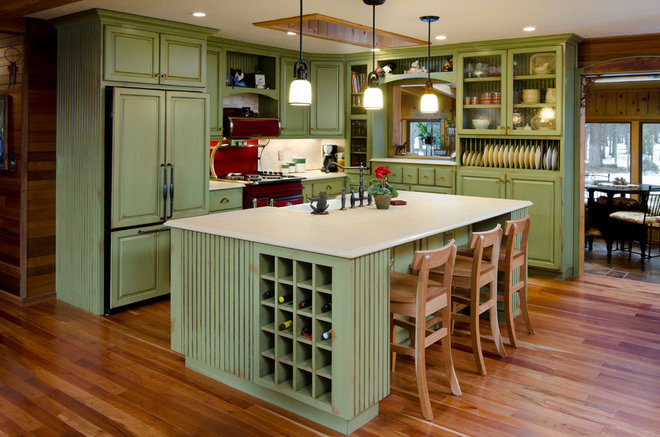
Consider
color an ally in making decisions about how to update the look of your
cabinets. The verdigris tone shown here is a soothing complement to the
hardwood floor, and allows a wonderful contrasting color pop of apple
red at the range. Notice the rusticated patina of the finish, which adds
dimension to the scheme. Other details, such as the bead-board panels,
bottle cubbyholes, plate rack and arch impression, give this design lots
of character.
Is this a good project for you? If your
cabinets have sturdy frames, refacing can be a good solution. The degree
to which you refurbish the cabinets is up to you. Simply painting or re-staining them can have a dramatic effect. In some cases it is
desirable to replace the doors and drawer fronts with a completely
different door style or wood species. Replacing the hardware, pulls and
knobs is another option to consider, and can make a nice difference
inexpensively. Repairing damaged wood can also be part of this process.
Combinations and variations of each of these options defines refacing
cabinets.
Permit: As long as you are not changing any electrical or plumbing, you probably can do this project without a permit. Check with a design professional or ask the local Building Department and describe your intentions in detail to find out for certain.
Project length:
Simpler modifications can be accomplished in a weekend, and even the
most involved projects can probably be completed within one month.
Best time to do this project: This is a project for the winter, after the holidays and before Easter, or in the fall before Halloween. Summer might be too hot, depending on your climate, or it might be best in milder climates.
Best time to do this project: This is a project for the winter, after the holidays and before Easter, or in the fall before Halloween. Summer might be too hot, depending on your climate, or it might be best in milder climates.
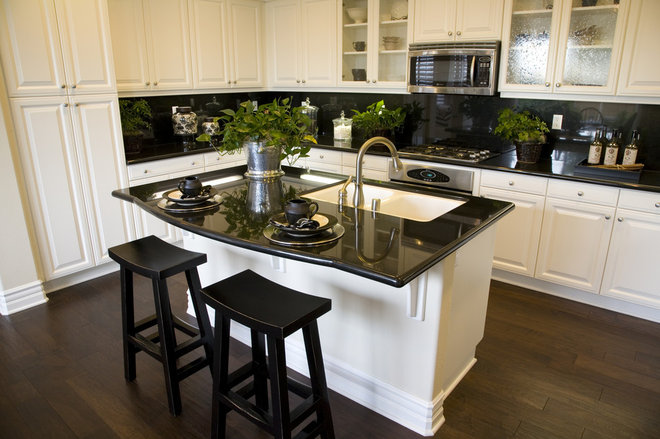
Black and white themes never go
out of style and can always look fresh and crisp. Shiny black counter-tops and a bright white cabinet finish dignify this comfortable
kitchen design with refacing. Nothing here is too complicated or fussy.
The two pairs of glass panel doors on either side of the microwave oven
delicately relieve the long bank of upper cabinets, preventing monotony.
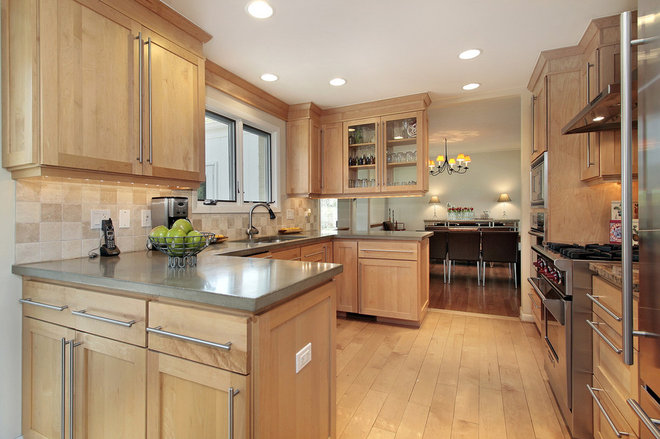
A soft contemporary theme has
been achieved in this refaced kitchen. Notice that the cabinet door is a
simple stile and rail with a flat-panel inset, which is called a Shaker
style. This is one of the least expensive door styles available, and it
can be used in both modern and traditional interiors effectively.
Stainless steel hardware complements the coordinating appliances. Again,
glass upper cabinet doors provide interest.
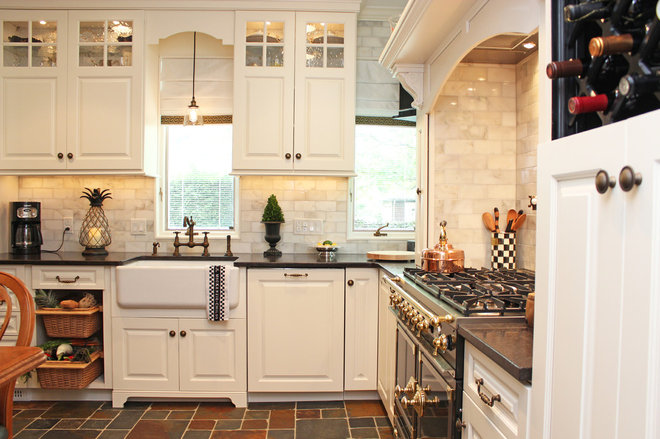
Most homes are traditional, and it seems that one can never go wrong when going with this classic design theme. Click here
to see the stark contrast between this refaced kitchen and the
original. Surprised that it used to be contemporary? While this kitchen
probably pushes the refacing envelope, you can see how dramatic a
transformation can be without the entire room’s being rebuilt.
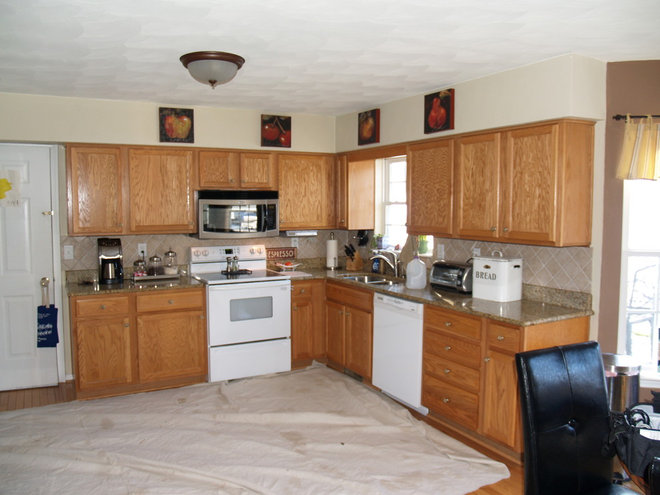
Let’s take a closer look at how
the previous examples have been transformed by first examining simpler
conversions. This kitchen has everything many people want in their
kitchens, including granite counter-tops and a nice tile backsplash. The
very basic layout suits the size of the room. But the gold-brown cabinet
finish and heavy wood grain make it appear like unfinished or raw wood.
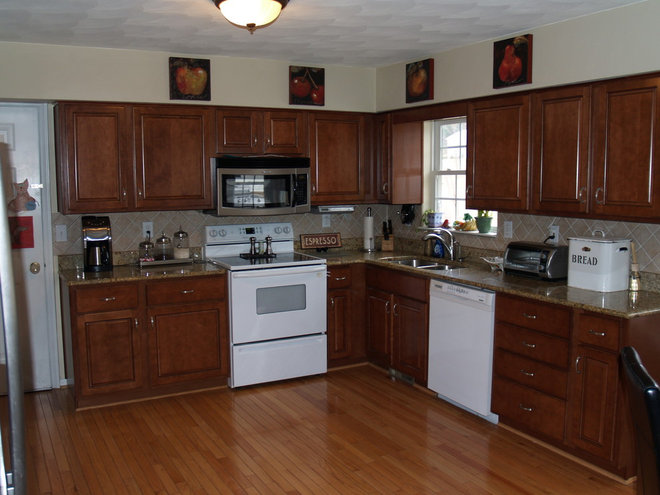
AFTER: By changing to
maple doors and drawer fronts, facing the frames with maple veneer and
applying a darker stain, the designer made the space appear far more
handsome. The maple has a much softer and mellower grain, and the darker
color gives the room a richer feeling.
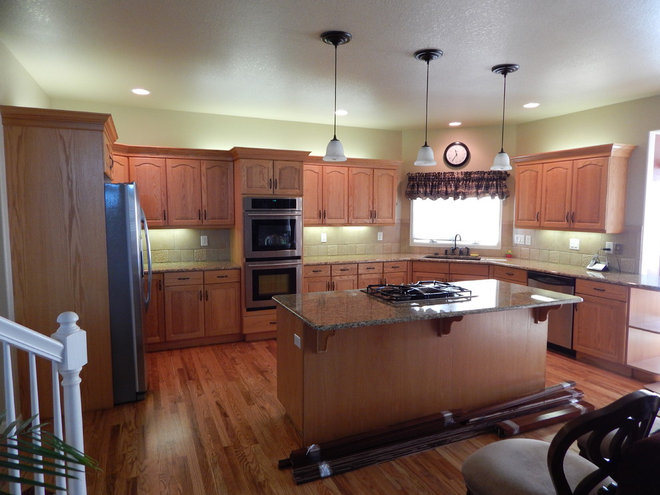
Here we have a very spacious and
nicely appointed kitchen with nice granite counter-tops and tile back-splashes. But again, the gold-brown and heavily grained oak cabinets
do not make the room feel special. Also, the door style looks dated.
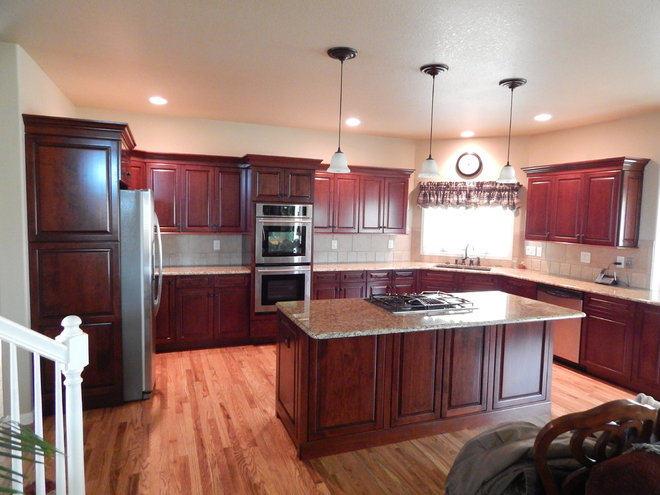
AFTER: Notice that most
elements from the original kitchen are still here. The difference is
that all the doors and drawer fronts have been changed to maple with a
furniture-quality finish. Also, finish panels added to the side of the
refrigerator cabinet and to the base of the island dress up these highly
visible elements, making this kitchen even nicer.
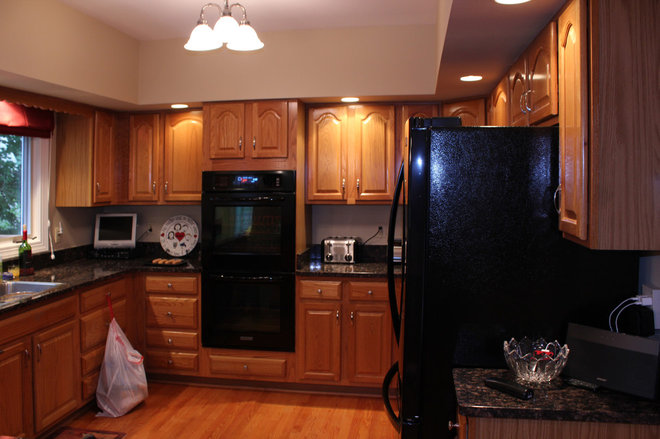
Once again heavily grained
stained oak cabinets cheapen the atmosphere in this roomy kitchen.
Otherwise, it has everything you would want, including a large window
over the sink that lets in lots of natural light, granite countertops
and up-to-date appliances.
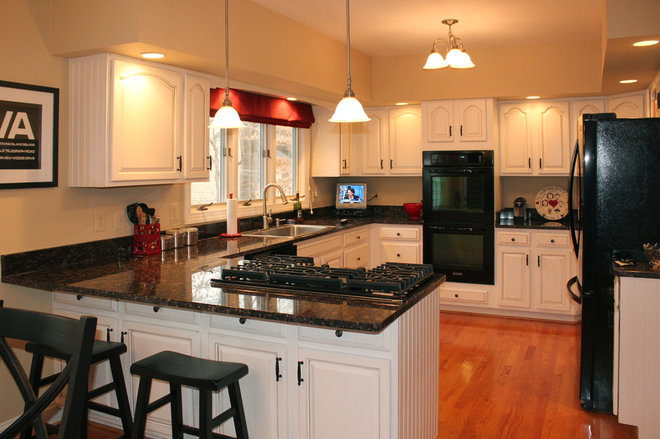
AFTER: This time the
cabinets, doors and all, stayed in place but got completely painted
over. Notice also that the pulls and knobs were replaced as well. Now
the darker granite contrasts the light cabinets in a sophisticated way.
The room feels cheery and clean compared to before.
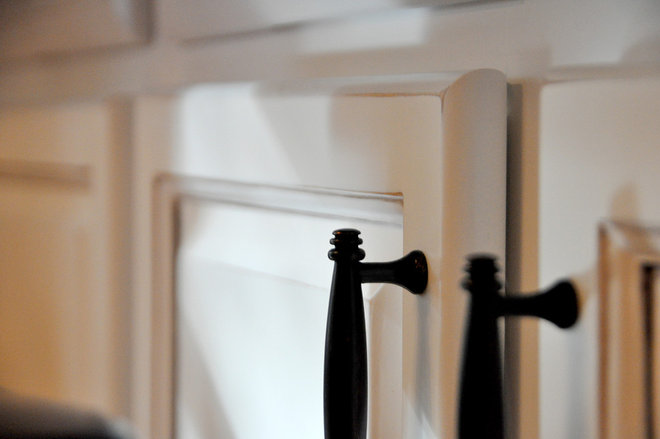
Looking up close at the newly
painted cabinets, you can see that the finish has been given a slightly
distressed edge. This effect adds depth and character. These are not
necessarily expensive cabinets to start, but this type of finish can
really add flavor.
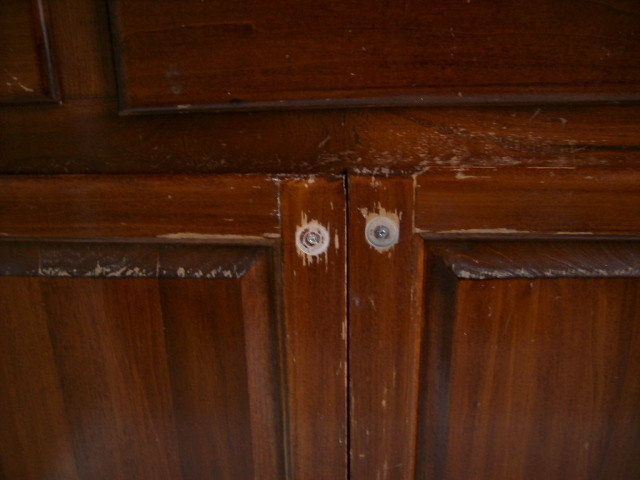
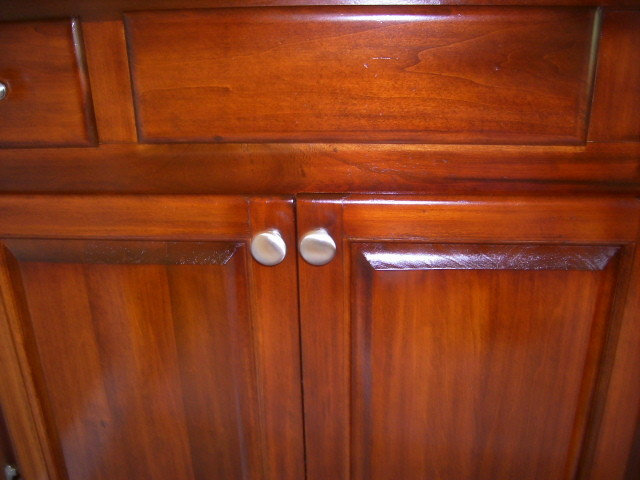
BEFORE: In some cases you
may be faced with damaged surfaces. The great thing about wood is that
it often can take a beating and still be revived for more life. As long
as the wood has not warped from water damage or other problems, don’t
give up on it.
AFTER: Here is the
repaired cabinet with the scratches sanded out and a new coat of stain
and varnish added. You will most likely want to find someone who does
this type of work on a regular basis unless you are skilled at
refinishing wood surfaces.
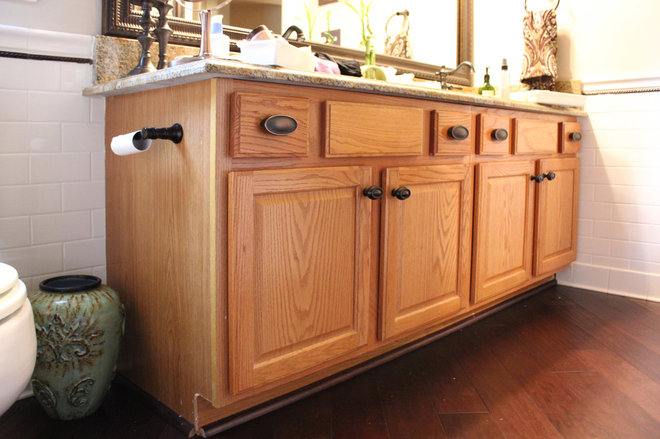
What is it about heavy oak grain
that it seems to show up so frequently? This bath cabinet is in
excellent shape, with plenty of drawers and storage. It would be a shame
to toss it out just because it is a little homely.
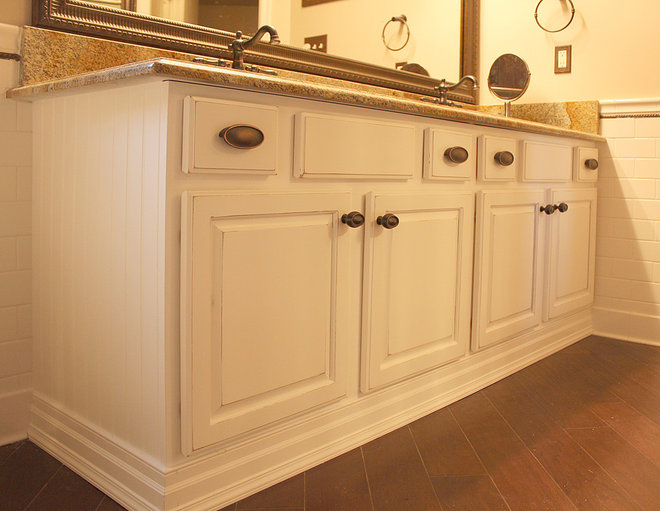
AFTER: A distressed
off-white lacquer finish transformed that dowdy cabinet into a
substantial statement. Notice that the original hardware, granite,
mirror, sinks and plumbing fixtures remain. By adding bead-board to the
end face and wrapping the base with a mold, the finisher created a whole
new statement with minimal effort.
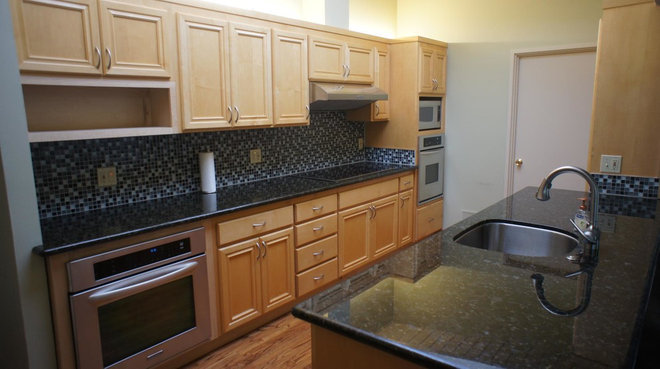
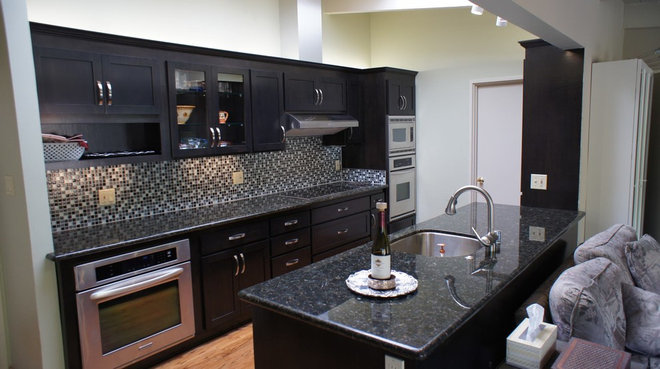
This modern and slick kitchen has
beautiful stone counter-tops and a marvelous mosaic tile backsplash.
Even the appliances are up-to-date. But the color of the wood finish and
the cabinet door style are not congruent with the space’s modern
elements and colors.
AFTER: Transformed with
black stain and new Shaker-style doors, the cabinets now make a
confident modernist statement. Note that the hardware has also been
replaced. The original had decent brushed metal pulls, but the remodeled
version has more substantial hardware that is easier to see and nicer
to touch.
Who to hire: If you are simply repainting your cabinets, this might be a DIY project.
Even replacing knobs and pulls is simple and can be done without too
much trouble. Consider using a handy person if you don’t have time to do
the work yourself. A handy person might also be able to do more demanding
work, such as replacing the doors and drawer fronts. If your remodel is
more extensive, architects, kitchen designers and interior decorators
can all be called upon to work on the project with you and provide
valuable design direction.
Cost: A simple paint job might
cost a few hundred dollars. For a more extensive refacing job, $5,000 to
$15,000 is likely. If the project involves replacing the counter-top and
appliances, you can spend considerably more.
Project questionnaire. This can help you break down what you need for your kitchen and help you develop a shopping list and budget:
- Replace cabinet hardware (knobs and pulls): • Yes • No
- Replace cabinet doors and drawer fronts: • Yes • No
- Replace wood species or finishes: Yes • No (coordinate with door style changes)
- Paint existing: Yes • No
- Stain existing: Yes • No
- Repair existing: Yes • No
- Add details such as glass doors: Yes • No
- Replace hinges: Yes • No
- Replace appliances: Yes • No
- Replace counter-tops: Yes • No
- Replace backsplash: Yes • No
- Replace lighting: Yes • No
- Add lighting: Yes • No
- Add finish panels: Yes • No
- DIY: Yes • No
- Hire professional: Yes • No
No comments:
Post a Comment